This is a Flow I demonstrated at SharePoint Saturday San Diego a couple weeks ago in my introductory Flow session… I wanted to show off a couple of new features in a simple Flow, so I chose the Microsoft To-Do connector and the Outlook @mention trigger, both added in mid-December 2017. Yes, I love taking risks with my demos by showing brand new things 😀
The idea is that if I’m @mentioned in an email, I want to create a To-Do task that’s due 7 days from now. There aren’t any templates available yet for To-Do, so I’m starting from scratch. This demo also shows a little bit about using Expressions in Flow, and in addition, when I decided for this blog post to add the Body of the email to the To-Do task, I had to also add in the Html to Text action (you’ll see why).
Trigger
The Trigger “When a new email mentioning me arrives” is available (currently in Preview) in both the Office 365 Outlook connector and the Outlook.com connector. I didn’t even know before I saw that, that you could @mention someone in an email, did you??
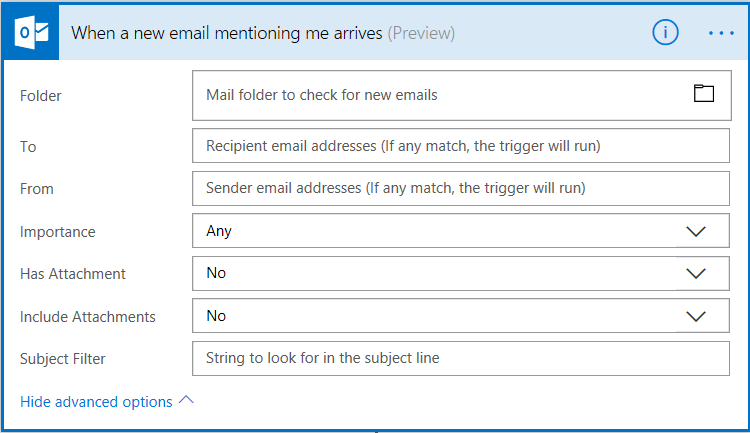 You get lots of filtering options if you click on Advanced Options (as I’ve done in the screenshot), but if you just leave everything as the default, it’ll catch any email that comes into your main Inbox where you’re @mentioned. So that part’s simple.
Action
And there’s only one Action, so this part is pretty simple, too. The only tiny trick is setting the due date, but it’s not hard. The Action we’re using is “Add a to-do”, which is one of (currently) only two Actions for the To-Do connector (also currently in Preview).
 The Subject is the only field that’s required to have a value, so from the Dynamic Content dialog I’ve chosen the Subject of the email to be used here. But I also want to set a Due Date, so I’m using an Expression for that…
addDays(triggerBody()?['DateTimeReceived'],7)
In case you haven’t used Expressions before, it’s pretty easy to do a simple one like this – I didn’t actually need to type or know any of that formula. Here’s how: Click into the field (i.e. Due Date), and in the dialog box, go to Expression:
 We’re dealing with a date, so you’d scroll down to the Date and Time group of functions, and click on AddDays. It shows you what parameters that function requires: a timestamp (i.e. something that’s of a timestamp data type), days (which is a number), and an optional formal (that’s what the ? denotes).
 When you click on it, it’s entered (with empty parentheses) up in the formula editor bar, which could stand to be larger – there’s a User Voice request for that which you could vote for :-).
 To fill in the parameters, we want to use whatever date the email was received, so with your cursor inside the addDays parentheses, click back on Dynamic Content to see the list of fields available. You’ll need to click on See More to see the field we need: Received Time. This automatically inserts the Workflow Definition Language equivalent: triggerBody()?[‘DateTimeReceived’]. Then you need to scroll your cursor over between the ] and the ) – this is where a larger edit field would come in handy – and type a comma and then 7 (for 7 days). This gives the formula I showed earlier, and when you click OK in the Dynamic Content dialog, it inserts the pink fx token in the Due Date field.
After that, I chose to set the Importance to High, and the Status to NotStarted. I also inserted the From field from the email into the Body of the To-Do task, so I can see who sent it to me, as well as the (converted) Body of the email itself (see the NOTE below). And lastly, I set which To-do List I want this task to go to. The dropdown in the To-do List field will automatically show all lists you have already created in To-Do, but it would be cool if that could be dynamic in some way, based on something like the email folder. You could also of course set the Reminder to Yes.
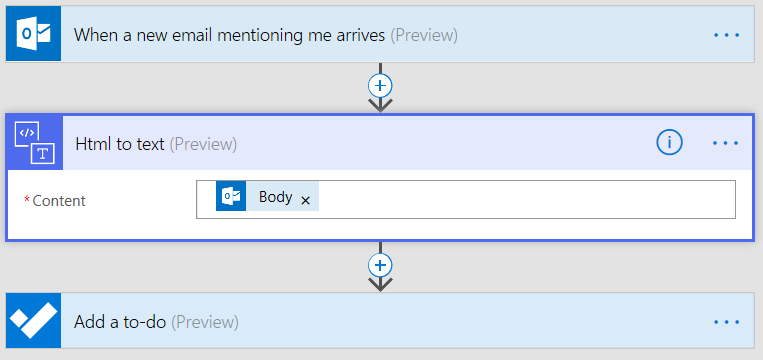
NOTE: For my SharePoint Saturday demo, I had only added the email’s From field to the To-Do task’s Body. But for this blog post, I decided to also add the Body of the email, as I mentioned above. But when you do that, at least when the email is sent from Outlook using HTML format, all the HTML tags (e.g. all sorts of style tags and whatnot) come through as text as well. To keep this from happening, I’ve inserted Flow’s Html to Text action just after the Trigger, and then used the output of that action in the To-Do task Body (see the screenshot of the Add a To-Do action above)..
And that’s it – pretty basic (this was an introductory Flow session), but it showcases a couple interesting features. Here’s a 6-minute video with an overview of the Flow, and then showing it in action…
I did two other demos at SPS San Diego (besides generally showing people around the UI) – I plan to write those up in blog posts to come…
